You pipe YouTube downloader
Download link for android
Why I created this app?
I personally faced a lot of problems in downloading a video online from my mobile or tab.
Normally you face a lot problems to download
1. There is no single app which guaranties this.
2. Even if I need to use some site YouTube app does not give us the actual link
3. The redirected links do not work in video downloaders.
4. I tried more than 10 apps from Google play all of which fails to download a video properly
Here is what I did:
I created an app myself tailored for YouTube download. Which works in all the ways possible for YouTube download through app or browser through just a share.. It works for other sites also but it's easy to download from sties other than YouTube..
How to use?
1. While browsing through YouTube videos in your YouTube app or your browser just click share and select the app 'youpipe'
That's it. It downloads to your downloads folder.
Sunday, November 16, 2014
YouPipe - YouTube downloader

Saturday, March 17, 2012
Configure internet in linux :oldpost
Many of my frnds recently asked me howto take internet in linux ..
And this blog entry is dedicated for them ,since I would like to give them a general idea of the matter ...
Before you start, please note that some modem manufacturers rely on Windows to operate their modem hardware (aka WinModems), and therefore your internal modem may not work. If you experience trouble then hopefully this page and this web site may help resolve the issue for you. Those with non-Winmodems and external Hayes compatible modems don't need to worry about this at all.
Configuring net in linux :
(For Dialup users:)Step 1 Start by Connecting and Rebooting
Once you have properly connected your modem and made sure it is on, reboot your Linux system. In all likelihood, your modem will be detected by the Linux hardware detection tool and automatically installed.
Step 2 Setup an account :Setup an account:
For a dialup connection u need an account :
For Keralites Bsnl provides an accountless connection offer ..Just dial using:
username: <stdcode without zero><Phone No:>
Passwd : bsnl10
and dial to 172222
For example : username: 4872332688
Passwd : bsnl10
Or you could easily buy other accounts ..
TIP: If your ISP tech person mentions that the ISP "does not support Linux," acknowledge you understand this and repeat your questions, since you're not asking them to help provide tech support for Linux, you're asking them how they allow access to their network for your use.
You will find out shortly something I've noticed from my experiences — some ISPs are far nicer about helping you do this than others!
Step 3 Configure the Modem and ISP Info
For configuring modem you need a driver to be setup just like in any OS..
Inorder for that you need to identify your modem
If could detect modem in some other OS ..Just query modem(In xp:Control Panel->Modem options->modems->properties->diagnostics->query modem) ..and get modem info ..
Then you could easily get your driver from net ..Otherwise refer to your vendor ..
For linux users : you could get most of the drivers from here if yours' is an HSF or HCF modem ...
Installation instructions must be read before proceding to kernel compilation and all ..
Download Documentation for HxF modem from here..
Now you have to configure modem by installing the driver ..
In linux you know :
./configure
make
make install
as per directions in INSTALL file ..
Done ..Now get the corresponding software for your linux distro ..
For example : kppp will do in Fedora ..
You can also get to this tool later by typing in a terminal prompt: internet-druid
Debian has a network-admin
Suse most probably you will need to compile the kernel to use kppp or KDE network tool....
For the process of detailing we'll discuss Fedora ,Suse and Debian
Step 4:
Debian Dial-Up
In Debian you will find a tool called 'network-admin' ..with which you could easily configure and dial your modem ..
network-admin will show a modem0 icon click that and 'configure' ...It coud autodetect modem if its in the link /dev/modem
For HSF Modems usually device made will be '/dev/ttySHSF0' and it will be informed after the installation ..Carefully read the messages after 'make install' ..
Most probably you will have to make a link called /dev/modem to point to '/dev/ttySHSF0'
Sometimes (if kernel modules did not match ) you may have to compile your kernel ..If so the application installer will inform you ...
In Fedora you will find a handy menu item under System Tools labeled Internet Connection Wizard.
It's actually the Internet Druid configuration tool and will simplify the process of identifying the modem and ISP details. Go ahead and start the tool by clicking on it.You can also get to this tool later by typing in a terminal prompt: internet-druid
Please notice that once in the tool you actually have the option of adding a number of new devices. For now just click once on the Modem connection and press the Forward button.
You will see the Select Modem screen. From here you should choose from the pull down top menu item the proper device for your modem. It may vary, but from my experience, in a majority of cases an external modem connected to the Serial port on the back of the PC will be /ttyS0.
Now you will see the screen that offers the chance to input details regarding your ISP and account.
You will see a listing of preloaded ISPs on the left menu. If you reside in one of the countries where an ISP is listed, then you can choose the details from the menu, under the appropriate national flag. If you reside in other countries like the U.S. or Canada you will need to input the details.
Be sure that what you put into the Phone Number items are applicable to your calling location. In most cases, you do not need to enter anything into either Prefix or Area Code. The Provider name field, as in a number of other configurations like Debian and Mandrake, is not essential and is there for your own reference.
Make sure you type in the correct login and password! When you've finished filling out the details, press the Forward button again.
The next screen refers to your DNS settings. In most cases you should make sure that it is set to automatically receive your IP address.
Also, be sure to select automatically obtaining the DNS information!
You will now see the Network Configuration tool appear. In the future, you can access this tool again by either going to the main menu and selecting System Settings, then choosing the Network icon, or you can type into a terminal window the following:
system_config_network
Below is my screenshot of the Network Configuration tool:
Click on each of the tabs (Router, Provider, etc.) and check. If everything looks like it matches your input then go to the Advanced tab and select the option to Let PPP do all authentication.
This allows the PPP (point to point protocol) to handle passing your login and account data to your ISP, which is the default for most situations. Press OK and return to the Network Configuration main window.
You can close your configuration window, which will give you the option to Save your changes. Click OK to save the changes you made.
Now, please reboot your Linux system. Rebooting has often resolved issues with hardware configuration and so I strongly recommend it after any new modem or network setup.
Once your Linux system is back up and running, you should be able to dialup your ISP and get online! Go to the main menu, choose System Set- tings, then Network to return to the Network Configuration tool , activate your modem
You should see a small window appear with the words:
Activating network device… please wait.
When this window disappears you are ready to surf the internet. Open your Linux web browser and enjoy!
NOTE: Troubleshooting and helpful TIPS are included at the end of this article.
SuSe Dial-Up
If you use SuSe or some other flavor running the latest KDE desktop these tips will help you get online with a dial-up modem.
Remember that even though the screens may not exactly match your own (all flavors differ somewhat), the tips and information I provide, such as automatically setting DNS, will apply to all flavors.
Begin by starting up the YaST tool, or your flavor's hardware configuration tool. If you're not sure what I am referring to, please review the article Post-Installation Configuration for guidance.
To start SuSe's YaST tool from your main menu choose System and then YaST. If it's not listed there, then from your main menu choose System, then Configuration, and click on the YaST icon.
From the YaST main menu choose Network Devices, and click on the Modem icon.
The Modem configuration window will open and offer you the chance to either configure an existing modem or add a modem. In many cases SuSe hardware detection has already identified and configured your modem for you. You would see it listed under Available are:
However, for those who don't see a modem listed or who get a modem listed that does not match the one installed, I include details on adding your modem below.
ADDING A MODEM TO SUSE:
To add a modem press the Change button, not the Configure button.
You will see a window that offers the option to Add your new modem and also Add ISP related information.
First begin by clicking on the upper Add button, which will allow you to configure your dialup modem.
Once you click Add you should see the Modem Parameters window.
The device name is very important. Sometimes the device is already preset to something like /dev/modem.
In many cases this is not correct and will not work. Instead, click on the pull down menu and select /ttyS0, which is usually the correct device name for a modem connected by a serial cable to the back of the Linux PC.
On the Modem Parameters window, you should also make sure that the Speaker on setting is selected and that any dialing prefix you need to dial out (such as 9 for dial out) is entered in the Dial prefix.
Click on the Next button to open the Select ISP window.
Here you will find a very thorough listing of many available ISPs. You will find a rather thorough list and if one of the ISPs is yours, you can simply select it and press Next.
However, for those folks who did not find their ISP listed, there is a very simple solution. Press the New button to configure it manually. Don't worry, this is a quick process.
You will see the Provider parameters screen.
On the Connection Parameters screen you will find an important setting! The Modify DNS when connected option is actually allowing your ISP to set your Linux DNS and in almost every case you must select this.
Please make sure the options in the example below are set on your configuration screen as well. I've circled them for easy reference.
Click Next and you will return to the Provider Parameters screen where all fields should now be filled in. You are ready to start your first Linux dial-up session as soon as you click Next and then the Finish button!
If you see the option to Configure Mail Now? select No. You can always do this later.
Now, reboot your Linux system
As I already mentioned earlier, rebooting can prevent many frustrating experiences with hardware configuration. I strongly recommend a reboot after any new modem or network setup. Once your Linux system has rebooted, look for the KDE Internet Tool located on the bottom right of your KDE menu. It looks like this:

You can press the right mouse button over the icon to view all of the tool's options or to manually dial-in. Otherwise, you simply click one time on the icon to begin dialing.
For Broadband:
Refer to :
Basic Guide to DSL/Cable Use
Exclusive Linux articles
http://www.reallylinux.com/docs/consult.shtml
DSL Connection
-anf
Why do you watch the same video online ? you ARE downloading it again
Most of the times you end up viewing the same video again whi
le you are online, right? . There is a way you can avoid downloading the same video in the browser again juz for viewing. This becomes a lot useful when your friend is viewing the same movie online.
WHEN YOU VIEW A VIDEO ONLINE IT IS DOWNLOADED LOCALLY TO YOUR COMPUTER . PLEASE SAVE IT FOR LATER USE IF REQUIRED .
READ THE FOLLOWING TO AVOID DOWNLOADING/VIEWING THE SAME VIDEO AGAIN.
When you are using chrome before pressing play for your video give a 'Ctrl+Shiift+I' .This will open a small window at bottom, now select network tab. Now when you play the video the network tab shows a growing progress bar in timeline for an item with type containing 'flv'. Right click that item and open in new tab to download the video. Rename it as .flv to play. (See below image )
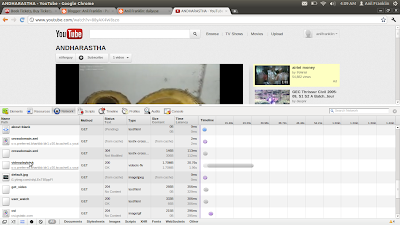
First off all, set your computer to view hidden files.
Tools -> Folder Options -> Select "Show Hidden Files and Folders"
Now go to
C:\Documents and Settings\"User Name"\Local Settings\Application Data\Mozilla\Firefox\Profiles\"Profile Name"\Cache. The files will be in there
If linux try in ~/.mozilla/firefox/[default user profile]/Cache
Juz copy it and rename to flv with your guess on file size.
ANY OTHER BROWSER IN LINUX(almost all latest linux distros, but the script is tailor made for ubuntu):
Juz run the below script(flicked online ;)). It will copy the open video to home folder of loggedin user. If the script din work for your linux distro(obviously other than ubuntu) you will have to go check /tmp folder yourself
~~~~~~~~~~~~~~~~~~~~~~~~~
#!/bin/bash
args=("$@")
args=`echo $args | sed 's/[/]$//'`
pids=`eval pgrep -f flashplayer`
for pid in $pids
do
lsoutput=$(lsof -p $pid | grep '/tmp/Flash[^ ]*')
IFS=$'\n'
for line in $lsoutput; do
lsout1=`echo $line | awk '{print "/proc/" $2 "/fd/" $4}' | sed 's/[rwu]$//'`
lsout2=`echo $line | awk '{print $9}' | awk -F '/' '{print $3}'`
if [ -n "$args" ];then
if [ -d $args ]; then
echo "Copying $lsout2 to $args/"
eval "cp $lsout1 $args/$lsout2.flv"
else
echo "The directory \"$args\" doesn't exist"
break
fi
else
echo "Copying $lsout2"
eval "cp $lsout1 $lsout2.flv"
fi
done
done
~~~~~~~~~~~~~~~~~~~~~~~~~
IE Users go search in %temp% folder(basically I dont like helping any microsoft product ;))
Tuesday, May 12, 2009
Logging in as root without logging in
We are all familiar with single-user mode in linux meant for root log in with all permissions .Those who hate multi-user environment where you need password for anything and everything may be fond of single user mode ..
But you must have thought of linux, at times having too much consciousness about your security . At times you must have said "Damn .. I want to copy this file from here to there ..Allow me ..this is ma sytem "..
When you enter into your system as root(via single-user mode) you need to type in your root password always . You could avoid that and allow your system to boot directly as root if u feel to do so..
Just edit a file and change a line .But beware its against your own security since everyone could enter your system similarly from your system ..
So inorder to startX automatically in sngle user mode :
gedit /etc/inittab &
change the line ..
~~:S:wait:/sbin/sulogin
as
~~:S:wait:/usr/bin/startx
finished ...
Changes happened :

- When you take single user mode .. password is not asked and you need not type startx .. It just gets into X .
- And you cant use your terminals at Ctrl+Alt+F1,F2 etc since they aren't started ..
- Also when log out from X you will go to multi user run level ..If kde installed it may go to kde log in ... But you could turn off instead of logging out safely ...
Saturday, February 21, 2009
LAMP on debian etch
Many of my friends have recently discussed with about difficulty of installing LAMP .(Linux Apache PHP Mysql ).But I dont think it is that difficult... neither do experts in this field ;) . But they have a reason to see it difficult .Most of the sites which come when you google about LAMP on debian is explaining the old ./configure make install thing ... and also about configuring stuffs...Also there is a chance to miss php-mysql module . So I would like to put these things in 3 simple steps here.
Just do this in debian ..1,2,3 ..
1. apt-get install apache php5 mysql-server php5-mysql
2. Edit the following files :
a. /etc/default/apache2 -- Set NO_START=0
b. /etc/apache2/httpd.conf -- Save the following .
servername localhost
AddType application/x-httpd-php3 .php3
AddType application/x-httpd-php3-source .phps
AddType application/x-httpd-php-source .phps
c. /etc/php5/apache2/php.ini -- search for mysql .. First hit ..remove ; comment for extension=mysql.so
3. Thats it now restart and use
sh /etc/init.d/apache2 start
sh /etc/init.d/mysql start
Enjoyy!!
Tuesday, February 17, 2009
Debian GNU/Linux 5.0 released
------------------------------
The Debian Project http://www.debian.org/
Debian GNU/Linux 5.0 released press@debian.org
February 14th, 2009 http://www.debian.org/News/
------------------------------
Debian GNU/Linux 5.0 released
The Debian Project is pleased to announce the official release of Debian
GNU/Linux version 5.0 (codenamed "Lenny") after 22 months of constant
development. Debian GNU/Linux is a free operating system which supports
a total of twelve processor architectures and includes the KDE, GNOME,
Xfce, and LXDE desktop environments. It also features compatibility with
the FHS v2.3 and software developed for version 3.2 of the LSB.
Debian GNU/Linux runs on computers ranging from palmtops and handheld
systems to supercomputers, and on nearly everything in between. A total
of twelve architectures are supported: Sun SPARC (sparc), HP Alpha
(alpha), Motorola/IBM PowerPC (powerpc), Intel IA-32 (i386), IA-64
(ia64), HP PA-RISC (hppa), MIPS (mips, mipsel), ARM (arm, armel), IBM
S/390 (s390), and AMD64 and Intel EM64T (amd64).
Debian GNU/Linux 5.0 "Lenny" adds support for Marvell's Orion platform
which is used in many storage devices. Supported storage devices include
the QNAP Turbo Station series, HP Media Vault mv2120, and Buffalo Kurobox
Pro. Additionally, "Lenny" now supports several Netbooks, in particular
the Eee PC by Asus. "Lenny" also contains the build tools for Emdebian
which allow Debian source packages to be cross-built and shrunk to suit
embedded ARM systems.
Debian GNU/Linux 5.0 "Lenny" includes the new ARM EABI port, "armel".
This new port provides a more efficient use of both modern and future ARM
processors. As a result, the old ARM port (arm) has now been deprecated.
This release includes numerous updated software packages, such as the K
Desktop Environment 3.5.10 (KDE), an updated version of the GNOME desktop
environment 2.22.2, the Xfce 4.4.2 desktop environment, LXDE 0.3.2.1, the
GNUstep desktop 7.3, X.Org 7.3, OpenOffice.org 2.4.1, GIMP 2.4.7,
Iceweasel 3.0.6 (an unbranded version of Mozilla Firefox), Icedove
2.0.0.19 (an unbranded version of Mozilla Thunderbird), PostgreSQL 8.3.6,
MySQL 5.0.51a, GNU Compiler Collection 4.3.2, Linux kernel
version 2.6.26, Apache 2.2.9, Samba 3.2.5, Python 2.5.2 and 2.4.6, Perl
5.10.0, PHP 5.2.6, Asterisk 1.4.21.2, Emacs 22, Inkscape 0.46, Nagios
3.06, Xen Hypervisor 3.2.1 (dom0 as well as domU support), OpenJDK 6b11,
and more than 23,000 other ready-to-use software packages (built from
over 12,000 source packages).
With the integration of X.Org 7.3 the X server autoconfigures itself with
most hardware. Newly introduced packages allow the full support of NTFS
filesystems and the use of most multimedia keys out of the box. Support
for Adobe(R) Flash(R) format files is available via the swfdec or Gnash
plugins. Overall improvements for notebooks have been introduced, such
as out of the box support of CPU frequency scaling. For leisure time
several new games have been added, including puzzle games as well as
first-person shooters. Also notable is the introduction of "goplay", a
graphical games browser offering filters, search, screenshots and
descriptions for games in Debian.
The availability and updates of OpenJDK, GNU Java compiler, GNU Java
bytecode interpreter, Classpath and other free versions of Sun's Java
technology, into Debian GNU/Linux 5.0 allow us to ship Java-based
applications in Debian's "main" repository.
Further improvements in system security include the installation of
available security updates before the first reboot by the Debian
Installer, the reduction of setuid root binaries and open ports in the
standard installation, and the use of GCC hardening features in the
builds of several security-critical packages. Various applications have
specific improvements, too. PHP for example is now built with the Suhosin
hardening patch.
For non-native English speaking users the package management systems now
support translated package descriptions and will automatically show the
description of a package in the native language of the user, if
available.
Debian GNU/Linux can be installed from various installation media such as
DVDs, CDs, USB sticks and floppies, or from the network. GNOME is the
default desktop environment and is contained on the first CD. Other
desktop environments - KDE, Xfce, or LXDE - can be installed through two
new alternative CD images. Again available with Debian GNU/Linux 5.0 are
multi-arch CDs and DVDs supporting installation of multiple architectures
from a single disc; and this release adds Blu-ray Discs, allowing the
archive for an entire architecture to be shipped on a single BD.
In addition to the regular installation media, Debian GNU/Linux can now
also be directly used without prior installation. The special images
used, known as live images, are available for CDs, USB sticks, and
netboot setups. Initially, these are provided for the amd64 and i386
architectures only.
The installation process for Debian GNU/Linux 5.0 has been improved in
many ways: among many other improvements, support for installation from
more than one CD or DVD has been restored, firmware required by some
devices can be loaded by using removable media, and installations via
Braille display are supported. The installer boot process has also
received much attention: a graphical menu can be used to choose
front-ends and desktop environments, and to select expert or rescue mode.
The installation system for Debian GNU/Linux has now been translated to
63 languages.
Debian GNU/Linux can be downloaded right now via bittorrent (the
recommended way), jigdo or HTTP; see Debian GNU/Linux on CDs [1] for
further information. It will soon be available on DVD, CD-ROM and
Blu-ray Disc from numerous vendors [2], too.
Upgrades to Debian GNU/Linux 5.0 from the previous release, Debian
GNU/Linux 4.0 (codenamed "Etch") are automatically handled by the
aptitude package management tool for most configurations, and to a
certain degree also by the apt-get package management tool. As always,
Debian GNU/Linux systems can be upgraded painlessly, in place, without
any forced downtime, but it is strongly recommended to read the release
notes [3] for possible issues, and for detailed instructions on
installing and upgrading. The release notes will be further improved and
translated to additional languages in the weeks after the release.
1: http://www.debian.org/CD/
2: http://www.debian.org/CD/
3: http://www.debian.org/
Dedication
----------
Debian GNU/Linux 5.0 "Lenny" is dedicated to Thiemo Seufer, a Debian
Developer who died on December 26th, 2008 in a tragic car accident.
Thiemo was involved in Debian in many ways. He has maintained several
packages and was the main supporter of the Debian port to the MIPS
architectures. He was also a member of our kernel team, as well as a
member of the Debian Installer team. His contributions reached far
beyond the Debian project. He also worked on the MIPS port of the Linux
kernel, the MIPS emulation of qemu, and far too many smaller projects to
be named here.
Thiemo's work, commitment, broad technical knowledge and ability to share
this with others will be missed. Thiemo's contributions will not be
forgotten. The high standards of his work make it hard to pick up.
About Debian
------------
Debian GNU/Linux is a free operating system, developed by more than a
thousand volunteers from all over the world who collaborate via the
Internet. Debian's dedication to Free Software, its non-profit nature,
and its open development model make it unique among GNU/Linux
distributions.
The Debian project's key strengths are its volunteer base, its dedication
to the Debian Social Contract, and its commitment to provide the best
operating system possible. Debian 5.0 is another important step in that
direction.
Contact Information
-------------------
For further information, please visit the Debian web pages at
http://www.debian.org/ or send mail to <press@debian.org>.
Monday, August 4, 2008
Finally my own miniproject

PCSuite for Nokia Symbian 60 :
I was engaged in mentioning about projects I did ..But as often I have forgot to mention my own mini-project .
It was a piece of work we actually did before which made the interaction between bluetooth clients and server much easy . My friend Unni made a GUI for that now which gave a pretty enhanced look for that . Really a project goes hit with a GUI especially before my friends .. :)
Project details goes like this:
This could be actually called a PCSuite for Nokia (symbian 60).
File browsing uploading ,downloading , camera-handling, inbox-back-up , Gallery-functions ,sms-sending etc are all at one click from GUI .(as you see in the snapshot)
Finally I hav done a 'project'
I have been going on enchanting about too many projects ..
Panorama,PCSuite,image2Muzik and what not .. I was rocking with projects ..
Finally I could be proud of having something called list of projects ,but what use .. You can have a satisfaction over your code if you can derive that to an applicable field . Finally I got that feel from my midnight oil ..
A 'video conference' in 50 lines .. Again credit goes to python ..
We made it .. I was alone for the coding part (still it worked)..
A server sends streaming audio and video through two different threads and sockets which is accepted by client code running at the other end of lan .That is the design .
I will upload this whole set of 7 projects I did to chipmonks.co.in/projects in short .
For now ,Juz comment here to get the code ..
Wednesday, July 30, 2008
Panorama
Yeah .. The panorama project mentioned before also got its way through ... :)
Mikhil did the hardware part . Actually he himself has made my code working ..
Camera will now rotate using a stepper motor to take photos which is later joined to make panoramas .But the automated process will hold you heart ..

Monday, July 28, 2008
Panorama maker ..
‘ Hail python the goddess of code ‘
Panorama of python’s victory of fast coding continues .. This time its a panorama factory, the art of making wide pictures, got done with python ..As usual necessity brought the idea . This was related to one of my classmate - fasil’s project idea .. Me being interested in python took it for a challenge as usual but stopped just with this code and shot my usual final statement : “hmm ! I think its better than more ..” 
What is panorama ?
Unnaturally wide pictures could be made by joining pictures end to end .. This is known as panorama pic ..
Definition royalty goes for me
- This is how a panorama looks like..

joining this pictures end to end requires care .. You have to find out the maximum matching position before you join pictures to ensure panoramic view ..Here I am attaching a 60 line code which converts pic1.jpg and pic2.jpg to a single finpic.jpg by normalising the match .. It is just a play with the code I know . But it could be useful ..
Last time when I posted about a project done in few lines python code , some of my friend asked me the code and I need to send it .. So this time I remind myself to start the habit of attaching code here ..
Panorama maker :
(python code to join pictures breadth wise)
File : proj_23.py
converts : pic1.jpg and pic2.jpg to finpic.jpg
(You can make it in a loop for doing a panorama using webcam )
Requirements :
- Python interpreter
- Python imaging library
Wednesday, May 14, 2008
Circuit Maker -- A tribute to laziness (this vaccation)
 Circuit Baker 1.0
See its so bad a GUI .. But it is working so well ..
Monday, May 5, 2008
I caught you Mr. Ahsan (Remove Ahsan's virus)
A few manual steps to catch Ahsan's virus :
Remove Ahsan's virus :
Description:
All stuffs gets his name.Your computer name becomes Ahsan's computer.
All executables gets closed . Continually checks floppies.
Can't do anything ;irritates you in every 5 seconds.
Remedy:
Log in to safe mode as Administrator:
0.Create and Save files named "Home Video.exe" and "csrss.exe" in all drives with 0 kb(If you can't do it within 5 seconds ,do it from a bootable media)
----You can't ignore this 0th step----
- Stop system.exe and userinit using taskmanager before it get closed
- Run RRt and disable virus effects : check all tick marks and press 'remove'
- Virus is out ; if your cmd.exe is enabled now .Take the command prompt from %system32%\cmd.exe
- Open regedit, search and delete all entries with his damn name "Ahsan" ,his site 110mb.com and that GW Bush
- Enable "Run":
Take regedit : HKEY_CURRENT_USER\Software\Microsoft\Windows\CurrentVersion\Policies\Explorer
and delete NoRun make the same with value 0 - Even now if you are not able to handle the situation do SDFix
- Thats it !!
Here goes my words during frustration during removal of this thing :
Ahsanmania has got an end .
This is Anil ..I too got an attack from Ahsan's virus ..
I know the 66 kb .exe from my Gmail spam folder was the beginning ..Now its a hazard for me and my friends . The systems in Men's hostel affected .
Really this is an achievement of Ahsan over me .Good one Ahsan ..
I saw his works(probably bad) in internet .The following links are some examples of his crooked mind .
http://gsmhosting.com/vbb/showthread.php?p=3255407
http://www.geekstogo.com/forum/virus-creation-t182300.html
He logs in to different forums with his name and a duplicate id and makes himself a subject of talk . It was really a 'worm' he did to systems . hmm . Wait Ahsan I am coming ......
He is a great man to earn all lots of bad words (usually people say) within a very short time .Then he said he is not the person who made virus and posted an antivirus which is the same thing, the same virus renamed . Beware he could hack into your PC too ..Never open small exe files if you aren't sure . Never install MobiMB3.6.6 from any site .The file is available in a lot of locations . All are his creations which makes it Ahsan's computer . Never read any forums with the user mobiMB,ambpk,Ahsan etc ..All these are his usual names ....
Anyway the internet - the biggest knowledge base says the only solution for this virus is to re-install xp .. Why don't they install linux and lose xp with that virus . Linux won't allow any Ahhhhhsaaannsss ...Damn !!
..
hmmm..
Ahsan Manan Khan Bhutta .. He has posted in almost all virus related forums at his (virus boom) time .. Inspite of the many who tried to catch him with IP , he swam in internet ..Ahsan, I am coming ...You are caught..
Yeah !!
Anil Franklin
src="http://pagead2.googlesyndication.com/pagead/show_ads.js">
Reply for comments,
ahsan,
I was not checking the comments for a month .You need my email address ? I have mentioned it in my blog http://anil.chipmonks.co.in .. Or you could have searched google .. Anil Franklin thats my name (anilfranklin@chipmonks.co.in)
Glad to see this if you are real 'ahsan' . All my effort was to get to you to make you know that this has made really a bad effect in south India too . Lots and lots of systems lost data with this virus Sorry if you are not the virus maker , I just meant to specify a way to get rid of this .
zain,
Now I know , you can't ignore that 0th step .
With information from site discussbits and some other forums , I have updated my ideas with all the possible ways and have rewritten the method as follows :
Detailed steps to remove Ahsan's virus :
1. start windows in safe mode with command prompt(user:admin, preferably a user other than having attacked)
2. use RRT Tool to enable run " if disabled".
3. Enable regediting if disabled with following reg key.
REG add HKCU\Software\Microsoft\Windows\CurrentVersion\Policies\System /v DisableRegistryTools /t REG_DWORD /d 0 /f
4. Open regedit, search and delete all entries with name "Ahsan" , site 110mb.com and Bush.
5. If your folder option is disabled enable it with following reg key "
HKEY_CURRENT_USER\Software\Microsoft\Windows\Current Version\Policies\Explorer
HKEY_LOCAL_MACHINE\Software\Microsoft\Windows\Current Version\Policies\Explorer
Check if a DWORD value named NoFolderOptions exists in the pane on the right hand side of the screen
Delete it
6. If you are still unable to view the hidden files, which is disabled by virus, enable it with following proc and key.
HKEY_CURRENT_USER\Software\Microsoft\Windows\CurrentVersion\Explorer\Advanced. Find the value "Hidden" . Rightclick it and modify it to 1. If Key value hidden is not present create it
7. Check the following registery values and set the values given below in each registery key.
[HKEY_LOCAL_MACHINE\SOFTWARE\Microsoft\Windows\CurrentVersion\Explorer\Advanced\Folder\Hidden\NOHIDDEN]
"CheckedValue"=dword:02
"ValueName"="Hidden"
"DefaultValue"=dword: 02
[HKEY_LOCAL_MACHINE\SOFTWARE\Microsoft\Windows\CurrentVersion\Explorer\Advanced\Folder\Hidden\SHOWALL]
"CheckedValue"=dword: 01
"ValueName"="Hidden"
"DefaultValue"=dword:02
8. Now enable "show all hidden files / Hidden system files and folders", and search for following files and delete them all.
system.exe
csrss.exe
Home video.avi.exe
autorun
Note: these files will be in parent drives (D:, C:) and in windows folder.
9.Now you are done !
Sunday, April 20, 2008
Neko in web
See above interactive neko ...You can type commands like "right()" in the bottom pane...I am trying to embed all functions as for the current version of neko (Download the executable neko here ; Read about it here http://gnuvision.com)
Monday, March 31, 2008
Projects
Oh ! This summer may be the toughest time for me ,since I am engaged in list of projects for the time being ..But I love to be engaged in something ..always..
Our chipbaker project :
chipbake.sourceforge.net
- I haven't uploaded the files here for the time being (may be today/tomorrow )
My LPP project:
http://www.chipmonks.co.in/icecream.exe
- The final version
Our Miniproject:
http://www.chipmonks.co.in/Abstract1.doc
- Finishing in April
Some Neko touchups :
http://www.gnuvision.com
- Its our Prammode sir's initiative
And here comes SoC
Tuesday, February 26, 2008
Shoot your ideas
Summer Of code ahead ..
If you could write decent code its time ..Summer Of Code awaits you this summer too .
I think I should try for one this time ,since I already have some project ideas with me .
I would like to post my Idea for this summer .Gaining inspiration from last year's Mobin's project
, I would like to go ahead with a similar thing in python .May be a more interactive typing tutorial as a game .
Its front page looks like this ..
Tuesday, November 20, 2007
Configure internet in linux
Dial-up Internet with Linux
Many of my frnds recently asked me howto take internet in linux ..
And this blog entry is dedicated for them ,since I would like to give them a general idea of the matter ...
Before you start, please note that some modem manufacturers rely on Windows to operate their modem hardware (aka WinModems), and therefore your internal modem may not work. If you experience trouble then hopefully this page and this web site may help resolve the issue for you. Those with non-Winmodems and external Hayes compatible modems don't need to worry about this at all.
Configuring net in linux :
General step by step procedure :
- Click here to download an app and identify your modem in windows
- Identified your modem ..right ?..Now search for that in google n download itsdriver to install for your distro of linux .
- You could get most of the drivers from here if yours' is an HSF or HCF modem ...
- Installation instructions must be read before proceding to kernel compilation and all .. (if needed)
- Download Documentation for HxF modem from here.. (for conexant modems)
- Now, most probably you will be at your aim if not procede reading (distro specific)
Step 1 Start by Connecting and Rebooting
Once you have properly connected your modem and made sure it is on, reboot your Linux system. In all likelihood, your modem will be detected by the Linux hardware detection tool and automatically installed.
Step 2 Setup an account :Setup an account:
For a dialup connection u need an account :
For Keralites Bsnl provides an accountless connection offer ..Just dial using:
username: <stdcode without zero><Phone No:>
Passwd : bsnl10
and dial to 172222
For example : username: 4872332688
Passwd : bsnl10
Or you could easily buy other accounts ..
TIP: If your ISP tech person mentions that the ISP "does not support Linux," acknowledge you understand this and repeat your questions, since you're not asking them to help provide tech support for Linux, you're asking them how they allow access to their network for your use.
You will find out shortly something I've noticed from my experiences — some ISPs are far nicer about helping you do this than others!
Step 3 Configure the Modem and ISP Info
For configuring modem you need a driver to be setup just like in any OS..
Inorder for that you need to identify your modem
If could detect modem in some other OS ..Just query modem(In xp:Control Panel->Modem options->modems->properties->diagnostics->query modem) ..and get modem info ..
Then you could easily get your driver from net ..Otherwise refer to your vendor ..
For linux users : you could get most of the drivers from here if yours' is an HSF or HCF modem ...
Installation instructions must be read before proceding to kernel compilation and all ..
Download Documentation for HxF modem from here..
Now you have to configure modem by installing the driver ..
In linux you know :
./configure
make
make install
as per directions in INSTALL file ..
Done ..Now get the corresponding software for your linux distro ..
For example : kppp will do in Fedora ..
You can also get to this tool later by typing in a terminal prompt: internet-druid
Debian has a network-admin
Suse most probably you will need to compile the kernel to use kppp or KDE network tool....
For the process of detailing we'll discuss Fedora ,Suse and Debian
Step 4:
Debian Dial-Up
In Debian you will find a tool called 'network-admin' ..with which you could easily configure and dial your modem ..
network-admin will show a modem0 icon click that and 'configure' ...It coud autodetect modem if its in the link /dev/modem
For HSF Modems usually device made will be '/dev/ttySHSF0' and it will be informed after the installation ..Carefully read the messages after 'make install' ..
Most probably you will have to make a link called /dev/modem to point to '/dev/ttySHSF0'
Sometimes (if kernel modules did not match ) you may have to compile your kernel ..If so the application installer will inform you ...
In Fedora you will find a handy menu item under System Tools labeled Internet Connection Wizard.
It's actually the Internet Druid configuration tool and will simplify the process of identifying the modem and ISP details. Go ahead and start the tool by clicking on it.You can also get to this tool later by typing in a terminal prompt: internet-druid
Please notice that once in the tool you actually have the option of adding a number of new devices. For now just click once on the Modem connection and press the Forward button.
You will see the Select Modem screen. From here you should choose from the pull down top menu item the proper device for your modem. It may vary, but from my experience, in a majority of cases an external modem connected to the Serial port on the back of the PC will be /ttyS0.
I also recommend that you change the volume to ensure you can hear what the modem is doing. Set it to Medium and press Forward.
Now you will see the screen that offers the chance to input details regarding your ISP and account.
You will see a listing of preloaded ISPs on the left menu. If you reside in one of the countries where an ISP is listed, then you can choose the details from the menu, under the appropriate national flag. If you reside in other countries like the U.S. or Canada you will need to input the details.
Be sure that what you put into the Phone Number items are applicable to your calling location. In most cases, you do not need to enter anything into either Prefix or Area Code. The Provider name field, as in a number of other configurations like Debian and Mandrake, is not essential and is there for your own reference.
Make sure you type in the correct login and password! When you've finished filling out the details, press the Forward button again.
The next screen refers to your DNS settings. In most cases you should make sure that it is set to automatically receive your IP address.Also, be sure to select automatically obtaining the DNS information!
You will now see the Network Configuration tool appear. In the future, you can access this tool again by either going to the main menu and selecting System Settings, then choosing the Network icon, or you can type into a terminal window the following:
system_config_network
Below is my screenshot of the Network Configuration tool:
By highlighting your Modem and then clicking on the Edit icon, you will be able to make changes to the configuration details. Most of the Modem configuration should already be completed and correct.
Click on each of the tabs (Router, Provider, etc.) and check. If everything looks like it matches your input then go to the Advanced tab and select the option to Let PPP do all authentication.
This allows the PPP (point to point protocol) to handle passing your login and account data to your ISP, which is the default for most situations. Press OK and return to the Network Configuration main window.
You can close your configuration window, which will give you the option to Save your changes. Click OK to save the changes you made.
Now, please reboot your Linux system. Rebooting has often resolved issues with hardware configuration and so I strongly recommend it after any new modem or network setup.
Once your Linux system is back up and running, you should be able to dialup your ISP and get online! Go to the main menu, choose System Set- tings, then Network to return to the Network Configuration tool , activate your modem
You should see a small window appear with the words:
Activating network device… please wait.
When this window disappears you are ready to surf the internet. Open your Linux web browser and enjoy!
NOTE: Troubleshooting and helpful TIPS are included at the end of this article.
SuSe Dial-Up
If you use SuSe or some other flavor running the latest KDE desktop these tips will help you get online with a dial-up modem.
Remember that even though the screens may not exactly match your own (all flavors differ somewhat), the tips and information I provide, such as automatically setting DNS, will apply to all flavors.
Begin by starting up the YaST tool, or your flavor's hardware configuration tool. If you're not sure what I am referring to, please review the article Post-Installation Configuration for guidance.
To start SuSe's YaST tool from your main menu choose System and then YaST. If it's not listed there, then from your main menu choose System, then Configuration, and click on the YaST icon.
From the YaST main menu choose Network Devices, and click on the Modem icon.
The Modem configuration window will open and offer you the chance to either configure an existing modem or add a modem. In many cases SuSe hardware detection has already identified and configured your modem for you. You would see it listed under Available are:
However, for those who don't see a modem listed or who get a modem listed that does not match the one installed, I include details on adding your modem below.
ADDING A MODEM TO SUSE:
To add a modem press the Change button, not the Configure button.
You will see a window that offers the option to Add your new modem and also Add ISP related information.
First begin by clicking on the upper Add button, which will allow you to configure your dialup modem.
Once you click Add you should see the Modem Parameters window.
The device name is very important. Sometimes the device is already preset to something like /dev/modem.
In many cases this is not correct and will not work. Instead, click on the pull down menu and select /ttyS0, which is usually the correct device name for a modem connected by a serial cable to the back of the Linux PC.
On the Modem Parameters window, you should also make sure that the Speaker on setting is selected and that any dialing prefix you need to dial out (such as 9 for dial out) is entered in the Dial prefix.
Click on the Next button to open the Select ISP window.
Here you will find a very thorough listing of many available ISPs. You will find a rather thorough list and if one of the ISPs is yours, you can simply select it and press Next.
However, for those folks who did not find their ISP listed, there is a very simple solution. Press the New button to configure it manually. Don't worry, this is a quick process.
You will see the Provider parameters screen.
As I mentioned, almost all flavors I've used across the board included a "Provider Name" field. This is used exclusively for your information and is not essential to the login process. However, the phone number field must be correct! Once you finish filling out the information on this screen press Next one more time.
On the Connection Parameters screen you will find an important setting! The Modify DNS when connected option is actually allowing your ISP to set your Linux DNS and in almost every case you must select this.
Please make sure the options in the example below are set on your configuration screen as well. I've circled them for easy reference.
Selecting Firewall is another important option and will basically disable inbound connection requests. You should almost always have firewall selected. Only in cases when I'm using the Linux system as a server does the firewall sometimes impede rightful inbound requests.
Click Next and you will return to the Provider Parameters screen where all fields should now be filled in. You are ready to start your first Linux dial-up session as soon as you click Next and then the Finish button!
If you see the option to Configure Mail Now? select No. You can always do this later.
Now, reboot your Linux system
As I already mentioned earlier, rebooting can prevent many frustrating experiences with hardware configuration. I strongly recommend a reboot after any new modem or network setup. Once your Linux system has rebooted, look for the KDE Internet Tool located on the bottom right of your KDE menu. It looks like this:
You can press the right mouse button over the icon to view all of the tool's options or to manually dial-in. Otherwise, you simply click one time on the icon to begin dialing.
Once your dial-in is completed, you're ready to browse the internet! Open your Linux web browser and enjoy.
To end your dial-up connection click once more on the little KDE Internet Tool icon:
That's it!For Broadband:
Refer to :
Basic Guide to DSL/Cable Use
Exclusive Linux articles
http://www.reallylinux.com/docs/consult.shtml
DSL Connection
-anf
Friday, November 16, 2007
Newfolder.exe virus
Single click removal techniques:
Automatically remove using :
Tool1 , Tool2
- Tool1 (Newfolder.exe) removal will remove it frm ur system as well as usb drives
- Tool2 (sdfix.exe) will be needed when u r late reaching here ..that is to fix registry and to prevent this virus ..
Manually remove it (new folder.exe Fix)
Delete File named svichossst.exe
[HKEY_CURRENT_USER\Software\Microsoft\Windows\CurrentVersion\Policies\System]
“@”=[HKEY_CURRENT_USER\Software\Microsoft\Windows\CurrentVersion\Run]
“Yahoo Messengger”=
“Shell”=”Explorer.exe “
Orkut virus

Let this be the first technical post here ..Since a lot our hostelites are suffering frm the virus ..
This is because of a virus named USBWORM ( orkut ,youtube blocking virus ) do the following step to get the result.
Automatically remove :
Complete fixation could be downloaded from here ...
It could remove the problem of losing hidden files too...
Usage Instructions:
1) Download the fix and run on infected machine.2) It will ask for a re login.
3) After logging again run the fix again. The worm will be removed succesully.
Manually do it :
1. Go to your Start menu, click on Run and open up your Registry Editor by typing "regedit"
2. Once there go to: HKEY_LOCAL_MACHINE\Software\Microsoft\Windows\CurrentVersion\Explorer\Advanced\Folde r\Hidden\SHOWALL
3. Delete the value CheckedValue. (Its type should be REG_SZ and data should be 2.)
4. Create a new DWORD value called CheckedValue (same as above, except that the type is REG_DWORD) by right clicking on the right pane->New->DWORD Value. Modify the value data to 1 (0x00000001).
After the whole thing there is a chance for the virus to getin again ..unless u re-install the Mozilla ...If u didn't do this the virus may be activated once again if u take mozilla after the whole thing ..
Wednesday, November 14, 2007
Glorious n dread

Mee though just right, and the fixt Laws of Heav'n